Oh, if you have the right answer, please let me know! After being at a super valuable workshop about HCI Education during the pandemic, we have discussed a lot about our challenges in teaching prototyping techniques remotely.

Just to give context, every year we prototype an AR experience with our games design & art students. Initially, the workshops were going to be held in our studios and students should be developing ideas in groups. Of course, due to COVID-19 and social distancing, this was not possible anymore. Thus, how can we find alternatives to solve this issue?
One resource that I came across (Thank you Ilona Posner!) is a list of low-fi usability testing techniques. After looking at Ilona’s material and other materials I’ve gathered so far, I think we can organise a list of “things” and techniques that can be used. In this case, I would like to focus on digital interfaces, mixed reality and playful experiences.
Use materials available at home
From what I could see even with Ilona’s resources, we need to choose the materials wisely. Using paper can be a challenge since not everyone would have paper at home (I know, it sounds odd, but students might not have just simple A4 paper). Thus, think about using materials that you already have: scissors, glue, anything else you might have available at home. This example below is great (I’ve found the reference!).

Hug-your-laptop technique
Ilona introduced this fab idea of “hugging” your laptop and showing how people can interact with an interface. It simply puts the camera of the laptop facing the phone and with that, you can record yourself using the device. The video can be shared with potential users (or the group of students). However, it might not work well for AR experiences since you need to be moving around spaces.
Think aloud sessions
When recording the videos with a play-through or the experience, ask people to give you feedback on what they would do next. For example, you can try to make a presentation using PowerPoint or keynote, with “keyframes” and then some playable aspects afterwards. Ask people to tell you what to do and you press the buttons. NN Group has a great example of what is expected from participants. However, since the experience is not static if it is AR or spatial experience, it might be more difficult to have a full Think aloud session. This might require some combination with the Wizard of Oz technique and perhaps some journey mapping (which could be captured during the test).
Wizard of Oz
As you can guess by the name, Wizard of Oz prototyping mimics what the experience might be, by having the “wizard” pulling the buttons and a facilitator. You basically fake the functionality and there is a possibility to use different types of resources (including digital ones, such as PowerPoint or any other existing tools). The issue here is that if you’re home alone in the current social distancing scenario, it might be difficult to have a wizard and someone presenting the video/experience to the participant.
Paper prototyping (and other materials)
This CHI Workshop held in 2019 has shown some examples of using different materials, including play-doh. Of course, it all depends on the stages we are developing. For this post, I want to focus on the early stages of prototyping! From this workshop, by using play-doh and paper, the participants managed to achieve a great stage of “tinkering” with the objects.
Other materials were the creation of dioramas (in particular this was quite interesting and similar to the LEGO Serious Play technique), but with more flexibility.
Paper structures could be also useful, particularly if you want to show some type of animation. You can use triangles or even paper line sculpture techniques.

Sketching, of course
The first stage should be sketching the experience and what will happen. You can use some awesome templates, but you can also use photo sketching (by drawing on the top of the photo, for instance), videos and so on. Think about always using paper first. Of course, some students tend to be reluctant to use paper first and would like to start using digital tools. It should always have a balance. Ask them to use paper first.
Breaking the prototype into chunks
Things that are done remotely need to be broken into parts; otherwise, it can be extremely overwhelming. Perhaps in order to teach prototyping techniques, one approach can be letting students have specific hypotheses for each test. This is based on the simple method to “Determine What to Prototype” and it can be very useful in the current scenario. Thus, instead of having the whole experience to prototype at once, we can break it down into chunks.
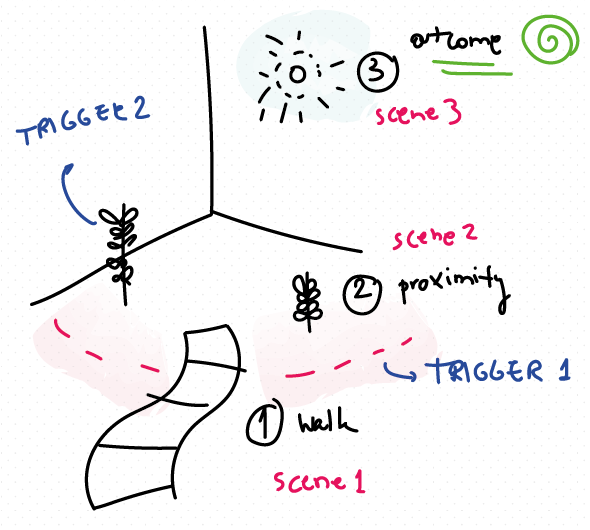
For example, break the experience into chunks through a journey. Each number 1, 2, and 3 would refer to a specific experience. There would be triggers in each part (if you consider them as scenes). This can be helpful when designing AR experiences. (Unfortunately, TorchApp [RIP] doesn’t work anymore, but you might want to use Figma or Adobe Aero to prototype less ‘lo-fi’ experiences).
But what about the collaboration?
This is a very challenging part. For remote collaboration with hands-on activities, breaking into chunks helps a lot. Other things that should be considered are the group dynamics and how each person can collaborate at each stage. Thus, having great documentation and collaborative space is crucial. Trello, Slack and other digital tools are great for this.
Key takeaways
- Acknowledge that we are all learning at the same time of making. This is crucial. Not the designers are tinkering with the materials, but also your ‘users’ might need to learn how to interact with your prototype in this new format
- Acknowledge that users might have to learn how to use a piece of technology before you ask them to interact with your prototype
- Test and test many times your session (do a lot of pilot tests!)
- If designing a session for your students, make sure students would have the materials available at home
- Keep it simple
- Let students create with the materials. As said, also acknowledge and leave room for ‘tinkering’
Some reading!